Removing a vehicle wrap needs patience, skill, and care. Trying to do it yourself can be risky. It’s best to get help from a professional to protect your vehicle.
At 218 Customs, we want to give you useful info. The vinyl wrap removal process has several steps. These steps help remove the wrap safely without harming your vehicle’s paint. For more details, check out our page on how to remove a car wrap.
Key Takeaways
- Seek professional help for safe removal
- Use the right tools to avoid damage
- Apply heat to loosen the adhesive
- Peel the wrap at a 45-degree angle
- Use adhesive remover for residue
## Understanding Vehicle Vinyl Wraps
Vinyl wraps are a hit among car lovers for personalizing their rides. They’re a budget-friendly way to change your car’s look. Plus, they protect your car’s paint.
What Are Vinyl Vehicle Wraps?
Vinyl wraps are big vinyl decals that cover your car’s paint. They’re made to be removable, so you can switch up your car’s look anytime. You can use them for ads, personal touches, or to keep the paint from fading.
Common Types of Vehicle Wraps
There are many types of vehicle wraps, each with its own perks. Here are a few:
- Full wraps: Cover the whole car.
- Partial wraps: Just cover part of the car.
- Specialty wraps: Have cool designs or finishes like gloss or metallic.
Average Lifespan of Quality Vinyl Wraps
The life of a vinyl wrap depends on the vinyl’s quality, the weather, and how well you take care of it. A top-notch wrap can last 3 to 5 years. Keeping it clean and avoiding extreme weather can make it last longer.
| Type of Wrap | Average Lifespan | Characteristics |
|---|---|---|
| Full Wrap | 3-5 years | Covers entire vehicle, durable |
| Partial Wrap | 3-5 years | Covers part of the vehicle, customizable |
| Specialty Wrap | 3-5 years | Unique designs or finishes, eye-catching |
Want to know more about vinyl wraps and paint? Check out our article on do car wraps damage your paint.
When Is It Time to Remove Your Vehicle Wrap?
As your vehicle wrap gets older, it’s key to know when it’s time to take it off. A worn-out wrap can harm your car’s look and even damage the paint if left too long.
Signs of Wrap Deterioration
There are clear signs your vehicle wrap is getting worse and needs to go:
- Fading or discoloration of the wrap material
- Cracking or peeling edges
- Loss of gloss or uneven sheen
- Damage from environmental factors like UV exposure or extreme weather
For more detailed info on checking your wrap’s condition, see this guide on knowing when to remove your vehicle.
Optimal Timing for Removal
The best time to take off your vehicle wrap is before it gets too damaged. Optimal removal timing helps avoid more damage and makes the process easier. A good vinyl wrap can last 3 to 5 years, depending on care and the environment.
Consequences of Delayed Removal
Waiting too long to remove your vehicle wrap can cause problems, like:
- Adhesive residue becoming harder to clean
- Higher risk of paint damage from the wrap’s adhesive
- A tougher removal process, possibly needing a pro
Removing your vehicle wrap on time helps avoid these problems. It makes the transition to a new wrap or back to your car’s original look smoother.
Professional vs. DIY Vinyl Wrap Removal
Removing a vinyl wrap from your car is more than just a cosmetic choice. It’s about picking the right method to protect your vehicle. While some try to do it themselves, it’s best to let a pro handle it to avoid damage.
Benefits of Professional Removal
Professional vinyl wrap removal comes with many advantages. It ensures the job is done right and safely. They use tools for removing vinyl wrap like heat guns and special scrapers to protect your car’s paint. They also handle any leftover adhesive residue, leaving your car looking clean.
When DIY Removal Is Appropriate
There are times when you might want to remove the wrap yourself. This could be if the wrap is new or if you’re familiar with the process. But, it’s important to use the right tools and follow the right steps to avoid harming your car’s surface. For tips, check out this article on safe vinyl wrap removal.
Cost Comparison Between Options
The cost of professional vinyl wrap removal varies based on your car’s size and the job’s complexity. On average, it costs between $200 to $500. DIY removal is free if you have the right tools; if not, you’ll need to buy a heat gun and other tools. Here’s a comparison:
| Removal Method | Cost | Risks |
|---|---|---|
| Professional Removal | $200-$500 | Low |
| DIY Removal | $0-$100 (tools) | High |

Choosing between professional and DIY vinyl wrap removal depends on your comfort and the risks. For many, the peace of mind from hiring a pro is worth the cost.
Essential Tools for Safe Vinyl Wrap Removal
To remove vinyl wrap safely, you need the right tools. The right equipment makes the job easier and protects your car’s paint.
Key Tools for Vinyl Wrap Removal
- Heat Gun: A heat gun softens the adhesive, making removal easier. Use a heat gun with adjustable settings to avoid paint damage.
- Plastic Scraper: A plastic scraper gently removes the vinyl wrap. It’s safer than metal scrapers, which can scratch the paint.
- Squeegee: A squeegee smooths out air bubbles and excess adhesive. It also helps apply even pressure.
- Adhesive Remover: After removing the vinyl, use an adhesive remover to clean off residue. Make sure it’s safe for your car’s paint.
- Microfiber Towels: Microfiber towels are great for cleaning and drying the surface. They’re gentle on the paint and absorb liquids well.
Using these tools ensures a safe and effective vinyl wrap removal. Work carefully and patiently to protect your car’s paint.
Preparing Your Vehicle for Wrap Removal
Before you start removing the vinyl wrap from your vehicle, it’s key to prepare it right. This ensures a smooth and safe process. Proper preparation also helps avoid damage to the vehicle’s paint and makes the removal more efficient.
Ideal Environmental Conditions
The best place to remove a vinyl wrap is in a dry, indoor area. The temperature should be between 70-80°F (21-27°C). This temperature range makes it easier to remove the wrap without damage.
Avoid removing the wrap in direct sunlight or extreme temperatures. This can make the adhesive too sticky or too brittle.
Cleaning the Vehicle Surface
Clean the vehicle’s surface well before starting the wrap removal. Use a mild soap and water to remove dirt, dust, or debris. This prevents scratches and makes the removal smooth.
Make sure to dry the surface completely to avoid water spots.
Protecting Sensitive Areas
Find and protect sensitive areas around the wrap, like trim, moldings, and emblems. Use masking tape or protective film to cover these areas. This step prevents damage during removal and keeps the vehicle looking good.
| Preparation Step | Importance |
|---|---|
| Ideal Environmental Conditions | Ensures safe and efficient wrap removal |
| Cleaning the Vehicle Surface | Prevents scratches and ensures smooth removal |
| Protecting Sensitive Areas | Prevents damage to trim, moldings, and emblems |
How Are Vinyl Wraps Removed: The Step-by-Step Process
Removing a vinyl wrap is easy if you do it right. It takes a few steps to get it done without harming the car’s paint.
Initial Heat Application Techniques
The first step is to heat the vinyl. You can use a heat gun or hair dryer for this. The heat makes the adhesive loosen, making it easier to remove.
It’s important to heat the vinyl evenly. Move the heat gun or hair dryer in a back-and-forth motion. This avoids overheating any area.
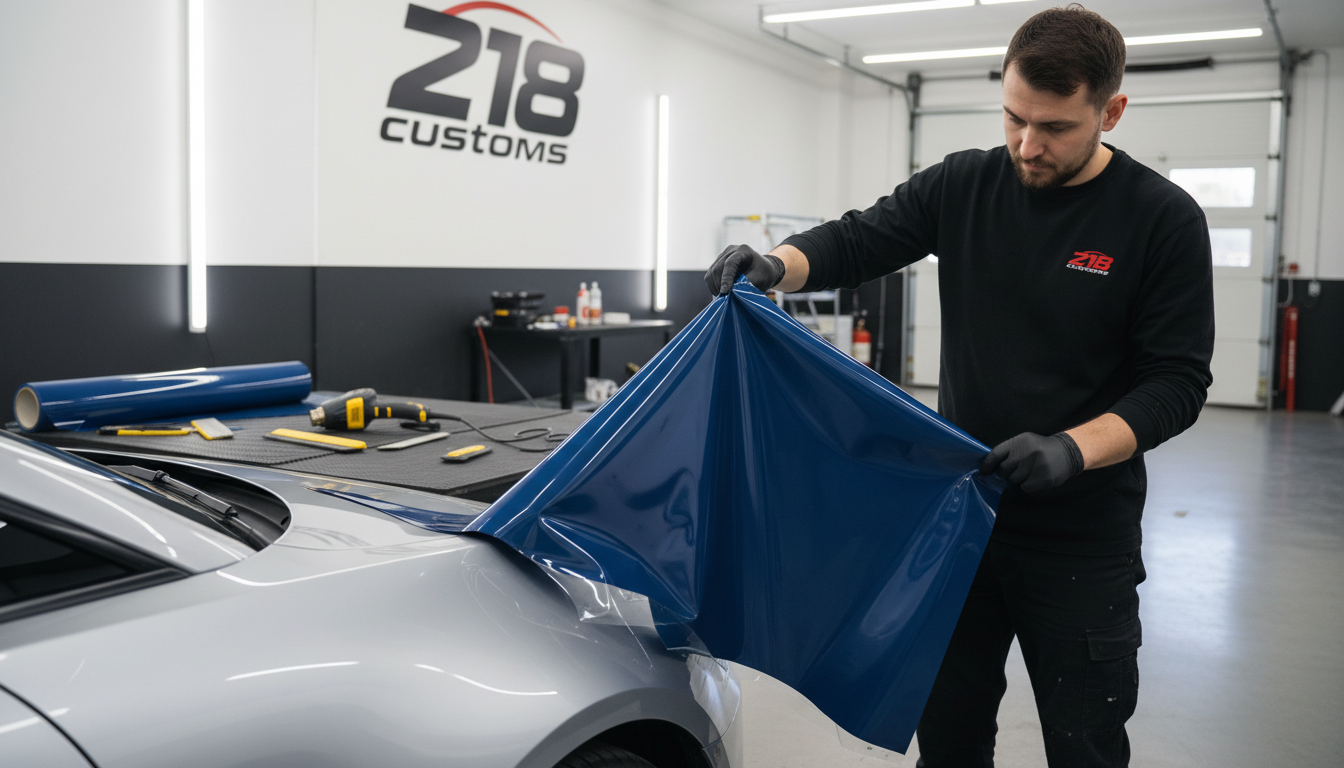
Proper Peeling Methods
After heating, start peeling the vinyl. Begin at one edge or corner. Gently lift the edge and start peeling away from the surface.
Peel the vinyl back on itself at a 45-degree angle. This helps avoid tearing the vinyl or leaving adhesive behind.
Dealing with Resistant Sections
Some parts of the vinyl wrap might be harder to remove. In these cases, more heat might be needed. But be careful not to overheat, as it can damage the paint.
If a section is really stubborn, use a plastic scraper to gently pry it off. Avoid metal scrapers, as they can scratch the surface.
Working Around Curves and Edges
Curves and edges can be tricky when removing a vinyl wrap. Use a mix of heat and careful peeling to get through these areas. Apply heat to the section and then slowly peel it away, following the surface’s shape.
This might take more patience, but it’s key for a clean removal.
| Removal Technique | Description | Tips |
|---|---|---|
| Heat Application | Using a heat gun or hair dryer to loosen the adhesive. | Move the heat source back and forth to avoid overheating. |
| Peeling | Starting at an edge or corner, peel the vinyl back on itself. | Peel at a 45-degree angle to minimize adhesive residue. |
| Dealing with Resistant Sections | Applying additional heat or using a plastic scraper. | Be cautious with the amount of heat and avoid metal scrapers. |
For more info on vinyl wraps and paint, check out 218 Customs. They explain the difference between vinyl wrap and paint.
Safety Precautions During Vinyl Wrap Removal
Removing a vinyl wrap from your vehicle needs careful steps. This is to avoid damaging the paint and keep you safe.
Protecting Your Vehicle’s Paint
It’s key to not use harsh chemicals or rough tools. They can scratch or change the color of your car’s paint. Use a plastic razor blade or scraper to carefully remove the vinyl.
Personal Safety Measures
Keeping yourself safe is important too. Wear gloves and safety glasses to protect against sharp edges or debris. Also, work in a place with good air flow to avoid breathing in adhesive fumes.
Avoiding Common Removal Mistakes
Don’t remove the wrap in direct sunlight or very cold weather. These conditions can make the adhesive too sticky or brittle. If needed, use a hair dryer on a low setting to help loosen the adhesive.
By taking these precautions, you can safely and effectively remove the vinyl wrap.
Removing Adhesive Residue After Wrap Removal
After taking off the vinyl wrap, you’ll find sticky residue left behind. This can be tough to get rid of and might harm your car’s paint if not done right.
Safe Adhesive Removal Products
Use products like Goo Gone to safely remove the residue. These are made to break down the adhesive without damaging the paint. Just apply it to a soft cloth and gently rub the area.
Techniques for Stubborn Residue
If the residue doesn’t come off easily, you might need to use the product a few times. Be patient and gentle to avoid scratching. For really tough cases, a specialized tool might help.
Avoiding Paint Damage During Cleanup
When cleaning, stay away from harsh chemicals or rough materials that could scratch or change the paint’s color. Always test a small, hidden spot first to make sure the product won’t harm the paint.
By following these steps and using the right products, you can remove the adhesive residue safely. This will help your vehicle look great again without any damage.
Potential Challenges During Vinyl Wrap Removal
Removing vinyl wraps can be tough, even more so with old or damaged ones. It’s crucial to be careful to not harm the car’s paint or leave sticky residue behind.
Dealing with Aged or Damaged Wraps
Old or damaged vinyl wraps are hard to remove. They might be brittle, cracked, or melted, making it hard to take them off in one piece. It’s important to be patient and gentle to prevent more damage.
- Use a heat gun to soften the adhesive, making it easier to remove the wrap.
- Apply a gentle pulling force to avoid tearing the wrap or damaging the paint.
- If the wrap is severely damaged, consider seeking professional help.
Addressing Paint Lift Concerns
Paint lift is a big risk when removing vinyl wraps. It happens when the adhesive is too strong and pulls the paint off with the wrap. To avoid this, use a gentle adhesive remover and don’t apply too much force.

Weather and Temperature Complications
Weather and temperature can greatly affect vinyl wrap removal. High temperatures can make the adhesive too soft, while low temperatures can make it too brittle. It’s best to remove the wrap in a controlled environment with a stable temperature.
Knowing these challenges can help vehicle owners prepare for vinyl wrap removal. Whether you do it yourself or get professional help, being aware of these issues can lead to a successful outcome.
Post-Removal Vehicle Care
It’s important to take care of your vehicle after removing the wrap. The paint may be damaged or have hidden imperfections. These can show up after the wrap is gone.
Inspecting for Paint Damage
Check your vehicle’s paint for any damage or leftover residue from the wrap. Look for chips, scratches, or adhesive left behind. Use a gentle cleaning solution and a microfiber cloth to check and clean the surface.
Recommended Washing and Detailing
Wash your vehicle with mild detergent and water to remove residue or solvent. Dry it thoroughly with a clean microfiber cloth to avoid water spots. Regular washing and detailing keep your vehicle looking good.
- Use a pH-balanced car wash soap.
- Avoid using high-pressure washes directly on the paint.
- Dry the vehicle thoroughly to prevent water spots.
Paint Correction Options
If you find paint imperfections, consider paint correction. Paint correction removes a thin layer of clear coat to fix scratches or swirl marks.
By following these tips, you can keep your vehicle’s paint in great shape. Regular care is essential for a car that looks its best.
Conclusion
Removing a vinyl wrap from your car might seem hard, but it’s doable with the right tools and knowledge. It takes patience, the right gear, and knowing each step well.
We’ve talked about how important the right methods and tools are for safe removal. By following our steps, you can protect your car’s paint and remove the wrap successfully.
When you remove vinyl wrap, you might face some issues. These include dealing with old or damaged wraps, paint lift, and weather problems.
Knowing these challenges and being careful can help you remove the wrap smoothly. You can do it yourself or get help from a pro. The most important thing is to be patient and take your time.
In short, removing vinyl wrap needs careful attention, the right tools, and a good understanding of the process. By following our advice, you can remove the wrap well and keep your car’s paint safe.